Yes! Spring is finally here! I don’t know about you, but I can’t wait to get back out in my garden and start planting. I know, I know, it’s only the beginning of April. But, for months now, I have stared out at my back yard every morning while sipping my coffee, longing to be one again with the my garden again.
Granted, the greenhouse wintered many of my lanai plants, but to be honest, I really couldn’t wait any longer. I love cooking and am always trying new things with fresh herbs and spices. So, I decided back in February to get creative with a little indoor gardening. It couldn’t be too big, because, after all, I already have WAY too many houseplants according to my hubs. But I REALLY wanted those fresh herbs! And so I got creative on a small scale and started a little indoor mason jar herb garden.
So, mason jars are easy to find and relatively cheap. I got most of my supplies at the local dollar store. Or simply using recycled glass jars from sauce and other jarred goods makes it easy when it comes to starting one of these gardens.
It’s a really easy project – just follow the simple steps below. Not only will you be adding a little garden appeal to your interior living space, but you will also have fresh herbs all year round.
Materials Needed
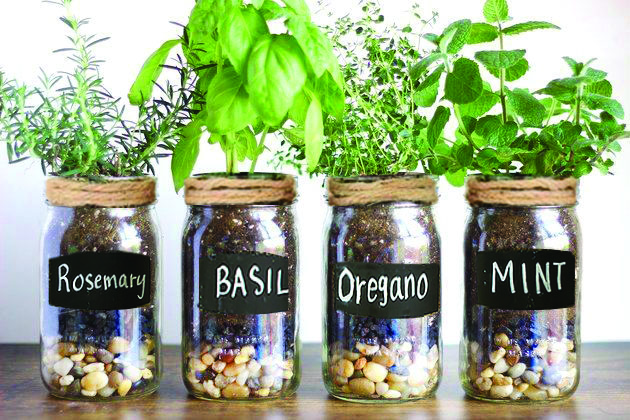
– Mason jars or recycled glass jars (lids not needed)
– Small decorative rocks, glass beads or marbles
– Potting Mix
– Starter herb plants or seeds
– Twine, colorful ribbon or wool
– Decorative labels
Step 1: Make a Drainage Layer
Layer about 2 inches with decorative rocks or glass beads in the bottom of clean jars. This is extremely important since jars don’t have holes to allow for water drainage. The 2-inch layer of rocks, glass beads or marbles at the bottom will keep the roots from rotting.
Step 2: Add the Potting Mix
Because Potting Mix isn’t like regular potting soil, it’s important that you buy the right stuff. Potting Mix is a planting medium that includes compost, peat, and at times, perlite. You want to make sure you use “potting mix,” because it allows for moisture to be retained and is perfect for container gardening. Fill the jars with potting mix right over your drainage layer, until it is one or 2 inches below the rim of the jar.
Step 3: Transplant Plant or Herb Seeds
If you prefer to purchase small starter herb plants, simply transfer them to the jars at this point. Make sure you pull the roots apart gently to encourage growth before you plant them in the jars. You can always remove some of the potting mix from the jars, if your starter plants have more established roots. Water when done, being careful not to over water.
You can also start your herbs from seed packets. Just carefully follow the instructions that are provided by the seed company to get the best results. In most cases, you will simply sow the seeds on top of the potting mix, cover with a little more potting mix and then water lightly.
Step 4: Decorate and Label the Jars
You can use some simple twine, colorful wool, ribbon, or anything else that appeals to you around the neck of the jar. Not only does it look nice, it also hides the screw top. Find a label that works with your style and write the individual herb names clearly, and affix to the jars.
Creative Tip: Instead of applying hard-to-removed adhesive labels, simply paint on a swatch of dark Chalkboard Paint, let dry and write your herb names on it with chalk. Not only does is look nice, it’s a great way to recycle your herb garden jars when needed.
Step 5: Maintenance
Move your jar herb garden around as needed, but they need at least six hours of sunshine every day, whether it is on the countertop or windowsill. Be sure that your herbs are watered regularly, but don’t overwater them. Harvest as needed to encourage new growth, and add flavor to whatever deliciousness you are cooking. Have fun and enjoy.